Kadang kita perlu mengganti DNS dengan dns public yg sesuai dengan yang kita inginkan, karna beberapa ISP di Indonesia menggunakan dns redirect, maka kita harus memakai cara memaksa DNS OpenDNS di MikroTik.
Pada tulisan saya menggunakan openDNS yang merupakan salah satu DNS tercepat dan yang paling penting kita bisa memilih apa saja kategori situs yang ingin kita blokir, seperti situs porno, adware, web spam, dan lain-lain, anda juga bisa memilih untuk tidak memblokir semua situs.
Untuk pengaturan blokir situs silahkan membuat akun dan masuk ke OpenDNS. Pada dashboard anda akan menemukan menu pada setting Web Content Filtering.
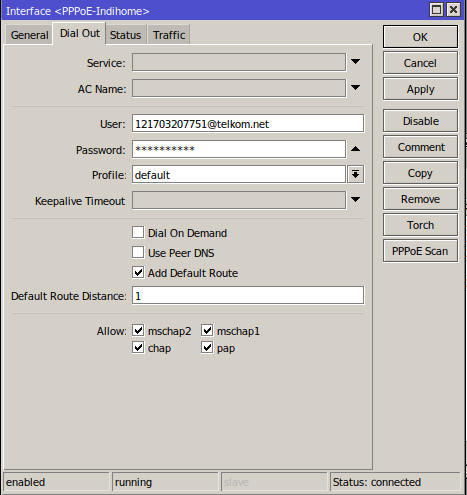
Sebelum melakukan setting pastikan kamu tidak mencentang Use peer DNS pada sumber internet kamu, seperti gambar di bawah ini:
- Apabila kamu terhubung ke modem dengan PPPoE Client, maka hapus centang seperti gambar dibawah:
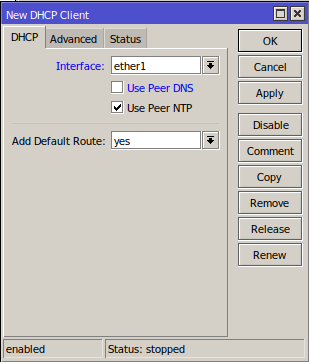
- Apabila kamu terhubung ke modem dengan DHCP Client, maka hapus centang seperti gambar dibawah:
Script dibawah ini bisa anda paste pada terminal melalui WinBox. Dengan script ini anda akan memaksa klien yang terkoneksi dengan mikrotik anda memakai DNS dari OpenDNS
/ip dns
set allow-remote-requests=yes servers=208.67.222.222,208.67.220.220

/ip firewall nat
add action=dst-nat chain=dstnat comment=OpenDNS dst-port=53,5353 protocol=udp to-addresses=208.67.222.222 to-ports=5353
Lihat pada IP – Firewall – NAT, settingan dengan comment OpenDNS harus berada di atas masquerade. Apabila kamu menggunakan mikrotik sebagai hotspot server tetap letakan rule NAT OpenDNS di atas _masquerade, _tapi berada dibawah NAT Hotspot, seperti gambar dibawah ini:

Apabila anda memakai IP Publik statik maka pengaturan selesai sampai disini.
Untuk anda yg memakai IP publik dynamic seperti Indihome sebenarnya kalau tidak ingin melakukan filter sudah selesai juga. Namun kalau kamu ingin melakukan filter seperti Pornografi, judi, dll pada dashboard opendns, tambahkan cara berikut ini:
Ada tambahan pengaturan pada System – Script – +. buat script baru dengan nama DNSoMatic isi pada script sebagai berikut:
Jika Anda Menggunakan Bridge di Modem Anda :
# DNSoMatic automatic DNS updates

#--------------- Change Values in this section to match your setup ------------------

# User account info of DNSoMatic

:local maticuser "Email DNSoMatic"
:local maticpass "Password DNSoMatic"

# Set the hostname or label of network to be updated. This is the part after the double colon (::) on the DNSoMatic services page.
# Hostnames with spaces are unsupported. Replace the value in the quotations below with your host names.
# To specify multiple hosts, separate them with commas.
# Use "all.dnsomatic.com" for the matichost to update all items in dnsomatic with this IP.

:local matichost "all.dnsomatic.com"

# Change to the name of interface that gets the changing IP address

:local inetinterface "PPPoE-Indihome"

#------------------------------------------------------------------------------------

# No more changes need

:global previousIP;

:if ([/interface get $inetinterface value-name=running]) do={
# Get the current IP on the interface
    :local currentIP [/ip address get [find interface="$inetinterface" disabled=no] address];

# Strip the net mask off the IP address
    :for i from=( [:len $currentIP] - 1) to=0 do={
        :if ( [:pick $currentIP $i] = "/") do={
            :set currentIP [:pick $currentIP 0 $i]
        }
    }

    :if ($currentIP != $previousIP) do={
        :log info "DNSoMatic: Update diperlukan"
        :set previousIP $currentIP

# The update URL. Note the "\3F" is hex for question mark (?). Required since ? is a special character in commands.
        :local url "http://updates.dnsomatic.com/nic/update\3Fmyip=$currentIP&wildcard=NOCHG&mx=NOCHG&backmx=NOCHG"
        :local matichostarray;
        :set matichostarray [:toarray $matichost];
        :foreach host in=$matichostarray do={
            :log info "DNSoMatic: Mengirim update untuk $host"
            /tool fetch url=($url . "&hostname=$host") user=$maticuser password=$maticpass mode=http dst-path=("dnsomaticupdate-" . $host . ".txt")
            :log info "DNSoMatic: Host $host di update di DNSoMatic dengan IP $currentIP"
        }
    }  else={
        :log info "DNSoMatic: IP sebelumnya $previousIP dan IP sekarang sama, tidak butuh update"
    }
} else={
    :log info "DNSoMatic: $inetinterface nonaktif / terdisable, jadi tidak ada update IP."
}
Jika anda menggunakan NAT pada modem anda gunakan script ini :
#--------------- Change Values in this section to match your setup ------------------
# User account info of OpenDNS
# Update-only password (obtained from OpenDNS Support). With two-factor authentication enabled, the use of an update only password is required.

:local odnsuser "Email DNSoMatic"
:local odnspass "Password DNSoMatic"

# Set the hostname or label of network to be updated. This is the name of your OpenDNS network on the Dashboard.
# Hostnames with spaces are unsupported. Replace the value in the quotations below with your host name.
# Only one host is supported
# Use "all.dnsomatic.com" for the matichost to update all items in dnsomatic with this IP.
# Note, you must have admin or edit (Read/Write/Grant in the OpenDNS Dashboard) to update IP addresses.

:local odnshost "all.dnsomatic.com"

# Change to the name of interface that gets the changing IP address
# May not be needed for your model number - commenting out this line may still work for single interface devices or if this is not supplied in the DNS-O-Matic script currently being used

:local inetinterface "ether1"

#------------------------------------------------------------------------------------

# No more changes needed, one optional change

:global previousIP;
:log info "Fetching current IP"

# Get the current public IP using DNS-O-Matic service.
/tool fetch url="http://myip.dnsomatic.com/" mode=http dst-path=mypublicip.txt

# Read the current public IP into the currentIP variable.
:local currentIP [/file get mypublicip.txt contents]
:log info "Fetched current IP as $currentIP"

# --------- Optional check to only run if the IP has changed (one line: :if)
# to disable, set line below to: ":if ($currentIP != 1) do={"

:if ($currentIP != $previousIP) do={
:log info "OpenDNS: Update needed"
:set previousIP $currentIP

# The update URL. Note the "\3F" is hex for question mark (?). Required since ? is a special character in commands.
# Some older editions of the MicroTik/WinBox OS require the following line instead (http) whereas newer versions require https.
# :local url "http://updates.opendns.com/nic/update\3Fhostname=$odnshost"

:local url "https://updates.opendns.com/nic/update\3Fhostname=$odnshost"
:log info "OpenDNS: Sending update for $odnshost"

/tool fetch url=($url) user=$odnsuser password=$odnspass mode=http dst-path=("/net_odns.txt")
:delay 2;

:local odnsReply [/file get net_odns.txt contents];
:log info "OpenDNS update complete."
:log info "OpenDNS reply was $odnsReply";

} else={
:log info "OpenDNS: Previous IP $previousIP and current IP equal, no update need"
}
lakukan perubahan pada skrip diatas pada tulisan yang saya bold cek pada bagian Email DNSoMatic, Password DNSoMatic, all.dnsomatic.com. dan sesuaikan :local inetinterface “PPPoE-Indihome” sesuai dengan sumber internet pada mikrotik anda, lalu simpan dengan nama “opendns”
Langkah terakhir anda bisa membuat scheduler untuk update IP otomatis tiap reboot dan setiap 5 menit dengan skrip berikut:
/system scheduler
add name="DNSoMatic" on-event="system script run DNSoMatic" policy=\
ftp,reboot,read,write,policy,test,password,sniff,sensitive,romon \
start-time=startup
add interval=5m name="opendns 5m" on-event="system script run DNSoMatic" \
policy=ftp,reboot,read,write,policy,test,password,sniff,sensitive,romon \
start-time=startup
Begitulah tutorial cara memaksa DNS OpenDNS di MikroTik, semoga membantu Anda.
Sumber: Ramitan