Internet connection speed is something that we always check at our homes and offices. The most common method that we use is by visiting a speed test website like speedtest.net. On that site, a javascript application is loaded in the web browser which selects the best (nearby) server based on the ping time and then the speed test results for that server are shown. Speedtest.net also uses a flash player to produce the result graphically.
The problem using these web based speed tests is that it does not allow you to schedule the speed test at regular intervals, e.g. as a cronjob and you can`t use them on headless servers. One application that can solve this problem is “speedtest-cli”. This application allows you to check your internet speed using the command line.
What is speedtest-cli?
Speedtest-cli is a script written in the Python programming language which measures the internet speed bidirectionally. This application allows you to check your internet speed upon distance in km, it can test against specific servers and it also provides a URL so that you can share your result on the internet.
How to install speedtest-cli on Linux?
In order to install the speedtest-cli application, you must have a Python 2.4-3.4 or an upgraded version installed in your system.
You can install the speedtest-cli tools using two methods. The first method includes the use of python-pip package manager, the second method is to download the Python script manually, make it executable and then run the application.
Method 1: Installing speedtest-cli using python-pip
The next step has to be run as root user, as I don`t want to prepend sudo for each command, please run the following command on Ubuntu first to become root user:
sudo su
- The first step is to make sure your list of packages from all Ubuntu repositories and PPA`s is up to date by running the following command:
apt-get update
Sample output:
- Next step is to install the pip package manager on your system. As you can see, the command will install many dependencies as well.
apt-get install python-pip
|
|
Press Y to continue
- After installing the package, you can install the application using this pip command:
pip install speedtest-cli
|
|
- If you want to upgrade the speedtest-cli application in future, you can use this command:
pip install speedtest-cli –-upgrade
|
|
Method 2: Installing the latest speedtest-cli manually from GitHub
- First you have to download the python script from GitHub using the command
|
|
|
|
[ <=> ] 17,653 --.-K/s in 0.006s
2016-02-19 11:25:34 (2.72 MB/s) - ‘master.zip’ saved [17653]
- The second step is to unpack the file that you have downloaded (master.zip) and extract it using the unzip command:
unzip master.zip
|
|
- When you have extracted the file, make the extracted script executable by going to the extracted directory and using the chown command.
cd speedtest-cli-maste
chmod 755 speedtest_cli.py
- To avoid typing the full path every time, move the executable file to /usr/local/bin by using the following command:
sudo mv speedtest_cli.py /usr/local/bin/speedtest-cli
How to test internet connection speed with speedtest-cli?
Run the speedtest-cli command to test the download and upload speed of your internet connection without any argument:
speedtest-cli
Testing download speed..................................................................
Download: 1806.72 Mbit/s
Testing upload speed...................................................
Upload: 1211.68 Mbit/s
If you want to check the speed result in bytes instead of bits, then use this command:
speedtest-cli --bytes
Testing download speed.....................................................................
Download: 199.06 Mbyte/s
Testing upload speed.....................................................................
Upload: 150.29 Mbyte/s
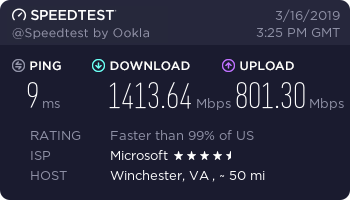
If you want to share the speed result with your friends, then you can download the image of the result with URL provided after the result.
speedtest-cli --share
Testing download speed.......................................................
Download: 1413.64 Mbit/s
Testing upload speed......................................................................
Upload: 801.30 Mbit/s
Share results: http://www.speedtest.net/result/8117590102.png
Below is the picture of my speed test result from the test above.
If you want information only on ping, download and upload then use:
speedtest-cli --simple
Ping: 8.071 ms
Download: 1671.42 Mbit/s
Upload: 1309.15 Mbit/s
You can also check the list of server based upon the distance in km by using:
speedtest-cli --list
2628) Telstra (Adelaide, Australia) [17098.98 km]
4051) Vodafone Hutchison Australia (AE) (Adelaide, Australia) [17098.98 km]
...........................................................................
3254) Vodafone Hutchison Australia (PH) (Perth, Australia) [18700.26 km]
1931) IX Australia (Perth, Australia) [18700.26 km]
By searching the list in terms of distance, you might have generated a big list of the servers.
To test the connection speed against a specific server, you have to use the server ID generated in step 5 and 6.
speedtest-cli --server [server ID]
speedtest-cli --server 7582
Here server ID 2604 is used as an example:
Hosted by PT. Telekomunikasi Indonesia (Jakarta) [16362.86 km]: 303.122 ms
Testing download speed.............................................
Download: 82.81 Mbit/s
Testing upload speed.........................................................
Upload: 13.76 Mbit/s
If you want to check the help and version number of the speedtest-cli tool, use these commands:
speedtest-cli --version
speedtest-cli 2.1.1
Python 2.7.15 (default, Jan 24 2019, 16:32:39) [GCC 8.2.0]
speedtest-cli --help
usage: speedtest_cli [-h] [--bytes] [--share] [--simple] [--list]
 [--server SERVER] [--mini MINI] [--source SOURCE]
 [--timeout TIMEOUT] [--secure] [--version]

Command line interface for testing internet bandwidth using speedtest.net.
--------------------------------------------------------------------------
https://github.com/sivel/speedtest-cli

optional arguments:
 -h, --help show this help message and exit
 --bytes Display values in bytes instead of bits. Does not affect
 the image generated by --share
 --share Generate and provide a URL to the speedtest.net share
 results image
 --simple Suppress verbose output, only show basic information
 --list Display a list of speedtest.net servers sorted by
 distance
 --server SERVER Specify a server ID to test against
 --mini MINI URL of the Speedtest Mini server
 --source SOURCE Source IP address to bind to
 --timeout TIMEOUT HTTP timeout in seconds. Default 10
 --secure Use HTTPS instead of HTTP when communicating with
 speedtest.net operated servers
 --version Show the version number and exit
Creating an internet speed log with speedtest-cli
Speedtest-cli can be run as cronjob to get an internet speed test log. Open the crontab with this command:
crontab -e
And add this line (I`ll assume that speedtest_cli.py is installed in /usr/local/bin) to the crontab:
30 00 * * * /usr/local/bin/speedtest-cli >> /tmp/speedlog.txt
Save the changes and exit the crontab editor. This will run a speed test at 0:30 each day and appends the result to the file /tmp/speedlog.txt.
Conclusion
This application is lightweight, easy to use and runs without any issue making it a must have tool for developers and system administrators.
Source: Howtoforge